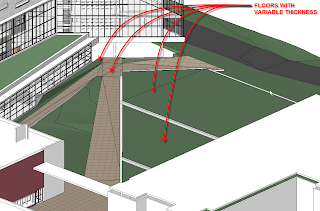
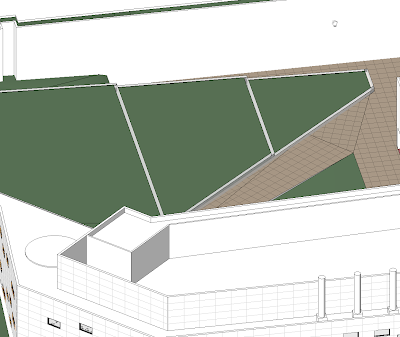
So yes, undoubtedly we were all quite excited to see this feature (VTF - Variable Thickness Floors) enter Revit Architecture 2008 (development thanks to our structural friends). If you don't know or didn't realize, Revit '08's floor can now be set to slope or warp in multiple directions even though the floor is still essentially "flat", this is particularly useful for crickets, tapered insulation, warped/sloped concrete decks and parking garages. This is all well and good, but a use that may have not yet been considered would be to use VTF for creating site or topographic elements.
 Huh!? you might say... Check it out... My current project we have this "courtyard" or "quad" that has significant change in elevation across it (about 5'-7'). The landscape architect's current design includes a couple of sloping paths and some stairs. In addition there are some manicured green lawns that are going to gently slope in one or two directions, all surrounded by masonry walls.
So I decided to create the paths and lawn areas all with VTF's. To start I created thin pads to cut into my topo surface so that I essentially had a hole in the ground for my in-fill.
I should add that the site file in this case is separate from the building file(s). So under all my buildings are 4" thick pads whose material is set to be "gravel". I used the same pad type under the courtyard, though that could change in the future...
In this case I chose to have one layer that stays constant (2" thick) then another layer that has a minimum thickness (in this case 4") for a total minimum thickness of 6" for my "grass". Both layers in the floor type are set to the same material so that in sections it reads as a monolithic material.
I also used a second floor type for the "paved" path ways, one note of caution though, when you subdivide a floor object it becomes much more difficult to manipulate the hatch pattern. It appears that the align tool no longer works correctly. You are still able to use move and rotate to adjust the pattern. At this time on our project because the landscape architect will produce the final documents, the non matching tile pattern doesn't bother me much, but I can see where it would cause problems. I suspect that Accurender will have the same difficulty, so at some point, I will probably adjust the hatch patter, and will render with a simple surface material applied (no pattern) and then merge a Hidden Line image with the rendered image to get a paving pattern.
 Once the floors were in place and set-up, I went back and did profile edits on the surrounding walls so that the tops of the walls taper with the slope of the adjoining "grass". Now I've got my courtyard in place in Revit, so that my elevations and sections start to read more correctly, and needless to say I think these results are better then what I would have been able to achieve by attempting to edit the topo surface. As of these images there is still some work to do, I need to put in some stairs, and make some other tweaks, add some flower beds, etc., but its a good start...


1 comment:
Hi there,
I absolutely love your revit blog and check it out most days. I am trying to do something similar and have set up a website called RevitZone.com I have put a link to your blog on my site- I hope you don't mind? Once again, great blog, keep it up!
Post a Comment